Showing posts with label crafts. Show all posts

Friday, August 24, 2012

"You Wanna Make a Memory?"


So we already shared great school supplies and cool lunch time items...now it is time to hold on to the memories made this school year.  I still am a huge fan of these from Papier Coterie, but here are two other fabulous items for recording the big events.


School Years Memory Book


I love this School Years Memory Book from Land of Nod.  It has a page for every year from Kindergarten to 12th grade.  You can record the name of their teacher, friends, favorite subjects...and there is a place for the school picture.  The book also has pockets to store important things, like rewards or report cards.

I love the idea having all of the main details written and stored in one easy place.  It is like a "big kids baby book" :)


My Keepsake Portfolio


This item you can buy before they even start school.  It is called the My Keepsake Portfolio from Lakeshore.  It is a giant cardboard accordion folder, that is divided into sections (one for each year). You can save their artwork, and bigger projects in here. 

Since they start creating beautiful artwork before Kindergarten, you can get this one right away.  What a fabulous way to keep all of their artwork safe, and keep your home from getting cluttered.  I plan on ordering one of these today.


Lakeshore has a promo code for free shipping, when you spend $79+.  Just enter the code FREESHIP at checkout. This offer is good until 9/4/12.  They have a ton of other great back to school supplies!!


Friday, August 10, 2012

Going on a Dino Hunt...Gonna Catch a Big One!!


I received a few emails asking me about the "dino hunt" that I do with my son, on my "Tech Free Tuesdays".   I figured I would share it with you guys:) 


Let's start with the dinosaurs...they are small hard plastic dinosaurs (they are the size or "Army Men Toys").  I bought a bag of 12 for $1, at a party store.  I plan on going back for another bag, so we can expand our game. 


We actually play two different versions of our game. 

The first version is more of a dino dig.  I bury dinosaurs in his sandbox, and then we dig and search for them together.  He loves looking for them, and screams when he finds one.  The best part of this game, is that it teaches him how to count.  We have 12 dinosaurs, so after each hunt we have to count to make sure that we have found all 12.  He is really starting to understand the concept of numbers, and when we don't have all 12 he immediately starts to dig again.


Our second dino hunt game, is more like a treasure hunt.  I quickly hide dinosaurs along our walk route, so that we can hunt for them as we walk.


He loves searching for them, and filling our bucket.  It helps keep him involved in the walk, and looking at nature.


Both dino hunts are fun for both of us, and teach us a lot. (before the show "Dino Dan" and our hunts, I never knew the name of most dinosaurs) 

I have already come up with a few new versions of our favorite game.  I will share them with you guys if they are a hit!!


In the mean time give these two games a try!! 

If your kids are not into dinosaurs, or you can't find them... don't worry!!  You can use anything,  Playmobil People, Lego People, Squinkies...  

You can also make your own items, such as clothespin people, painted rocks, coins....  The options are endless, just like the games are.  I promise you that games like these (that are inexpensive and that you create with your child) are the ones that you will have the most fun playing, and that they will most likely remember and some day play with their own kids :)

Have you created any inexpensive games/activities with your kids?? 

Please share in the comments below or on our Facebook page:)


Wednesday, July 11, 2012

"Life is About Using the Whole Box of Crayons."


My son is obsessed with coloring right now!!  He grabs the craft bag that I made for him, at least 4 times a day!!  I was obsessed with coloring when I was little, so I love having this activity to bond over!! 

I don't want him to lose interest, so I keep trying to find ways to make coloring more exciting.  We have coloring books, coloring placemats, construction paper, jumbo crayons, triangle crayons....

I am constantly on the hunt for cool new coloring products, here are some of my current favorites!!!


Wooden Crayon Truck


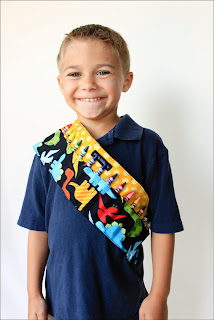
Crayon Sash


People Colors Crayons


Crayon Travel Wallet


Dry Erase Activity Mat


Mustache Crayons


Crayon Rub Art


Lego Crayons


8 in 1 Crayon


Coloring is a great activity for hot days!! Do you color when the weather is hot? What items or projects are your favorites?

As you know I am always on the hunt for new great things:)

Monday, July 9, 2012

Vehicular Fashion!!


I saw the coolest item on tv last week.... (I feel like I start too many sentences with this line, that is probably why I am starting to look like a potato;))


They are called, Wearables from a company called Kids Construction.  They are cardboard vehicles, that you decorate, assemble, and then wear.  My excitement for them, probably stems from my dream of getting to drive a bulldozer...that and my love for coloring.  Luckily for me, my son has inherited this love of trucks and coloring.  I can't wait to buy him one of these:) 


Right now they have three vehicles to choose from; Stunt Plane, Princess Carriage, and Dozer.  Each is cuter than the next.  These would be fantastic for a birthday party.  It gives you an activity to do, and then a great party favor to take home.  Another huge plus, is that they can be played with outdoors or indoors.  Making them a great year round item.

Kids Construction is a small American based company, so you can feel good about your purchase.  There is nothing  better than supporting a small business, and getting a quality made item in return!!


Wednesday, June 20, 2012

Come into the Painting on the Wall :)


Have you always wanted to paint murals on your walls, but just don't have the talent to do it??

If so I have found the item for you:)  I am so excited about these!! 


A company called Elephants on the Wall, has created an easy DIY mural kit. First you go to their website and decide which cute set that you want to buy.  Then they send you the pattern, transfer paper, instructions on how to apply the mural to your walls, and a color guide.

They claim that applying them to your wall is as easy as 1,2,3...  First you tape the transfer paper to the back of your pattern, and then tape them both to your wall.  Next you take a ballpoint pen and trace the entire image.  Take down the pattern and transfer paper, and then you use a "paint by numbers" system to fill in the color.
They must not be too hard to do, because the images that customers have sent in (of their own murals) are incredible.  I love the extra touches that many of them added, like lights, personalization, adding a valance (this was done to a carousel mural to look like the top of the carousel...love that!!)


Here is one of the finished products (this customer won 2nd place in a contest they held):


Head over and check out Elephants on the Wall today!!  They have so many cute murals to choose from, including ones for your Master Bedroom.  These would also be great for all of you teachers.  It seems like an affordable way to upgrade a classroom, or school hallway:)


Monday, May 14, 2012

Mini Crafters


Do you have a little "crafter" at home??

 If you do, then have I found a cool item for you!!  I would have loved this so much as a child, wait who am I kidding I still want it (my birthday is in November ;) )

They are called Kiwi Crates,and for $19.95 you have a new crate filled with crafts delivered to your door each month.


The crates come in different themes, such as dinosaurs, gardening, colors....
They are designed by parents and experts, and each crate has been kid tested!!  You can choose your subscription length (3, 6, 12), and then sit and wait for the doorbell to ring:)  How exciting!!  Everyone loves mail, and how nice is it to get something that both you and your kids will agree on.  The crates are educational, but still so fun!!

Head over and check them out!!!

They are a great gift for that grandchild let lives out of town, or a sick child in the hospital!!...or a 35 year old blogger:)

Thursday, May 10, 2012

Crafty Gifts...


These are crafts that I found on other blogs, that blew me away!!  If you click on the descriptions, it will take you to the original blog.  I always find new blogs to follow through links like this...I hope you do too:)  I am all about sharing the love.  I wish all bloggers were!!! It makes life, and the internet, so much more fun!!

I know I would love to receive any of these gifts.  I am sure your mother or grandmother will love them too.  I plan on making a few with my son!!


10 Things Book


Sewing Jar


Home Sweet Home Photo Gallery


Miniature Garden


Etch Your Own Baking Dish


Tin Can of Treats


Thumbprint Art


Monday, January 2, 2012

Something close to my heart ♥

Today I am going to share one of my favorite things, and one of my favorite crafts.

My husband and I got this made when we got married.  They are architectural photos that spell out our last name.  We love this, and get tons of compliments on it.


When we had our son, we wanted to do something similar for his room.  This time we made it.  We also decided to use actual letters we found, instead of architectural items. The first thing we did, was spend a day taking pictures of signs around us.  We tried to only use signs of places that we go to frequently.  We wanted the letters to have some meaning behind them.  We got them developed, and went through them picking out our favorites.


We also took pictures of the whole sign.  This way we could make a book of the places, to give to our son.  It gives him a memento, and helps him identify where the letters came from (when he gets older).


Here is our final project!!  Hope you love it as much as we do.


We are hoping this is something that can grow with our son.  The project was so fun to do, and looks great in his room.  It also was very inexpensive.  Our original (that we bought) cost a couple of hundred dollars.  This cost us about $25 to make.  We got the pictures developed by Snapfish during a deal, and  we bought the frame on sale from Aaron Brothers. It was actually the wrong color, but we spray painted it.

Enjoy making yours!!  If you make one, please share it on our Facebook page.  Also feel free to message us if you need any help.

Saturday, December 17, 2011

Ahoy Matey!!

We are in a stay at home build a fort kind of mode today, so my item of the day is something I wish we had...


It is a pop up pirate tent, by Schilling.  The best part, besides the cool pirate flag on top, is that it easily folds down so you can store it under a bed or in a closet.  Today we will be building our fort the old fashioned way (pillows and blankets).  


Here is a fun craft to do, for all of you sailing the seven seas with us today...


I found this on a great kids craft site: http://www.busybeekidscrafts.com


Here's how you make it...

1. Unfold your large piece of newspaper completely.

2. The amount you cut (or don't cut) from your newspaper will determine the size of your hat. We cut ¼ of the newspaper off so that it would fit a 3 year old. This size will most likely work best for 3-6 year olds. For older children you don't have to cut any off at all.

3. Fold your newspaper in half.

4. Fold both outer corners down, meeting in the middle.

5. Put a couple of pieces of scotch tape on each triangle.

6. You'll notice that there are two pieces of newspaper at the bottom of the hat. Take one piece and fold it up, secure with tape if you want; then turn the hat over and fold the other paper up.

7. Cut out the Jolly Roger from the center of the paper (keep the scraps, you'll be using them in the next step). Use the template as a stencil: Place the paper over top of the center of your hat and brush paint over top. Remove the paper and you'll have your Jolly Roger printed on your hat. Younger children will find the paint easier, older children can use a marker in the stencil. Note: You will need to print the Jolly Roger Stencil on heavy paper if you want to use it for more than one hat.

8. Cut out the eyes and nose from the cut out stencil and glue them in place, and you're all done your Newspaper Pirate Hat!


Saturday, December 10, 2011

You Know Dasher and Dancer and Prancer....

This is what we will be doing today...or a version of it!!


This is a craft that I found on the Disney Family Fun site.  It is a great for all ages.  With the younger ones (like my son), it is a fun way to remember how little their hands once were.  Obviously Mom and Dad will be decorating the reindeer for the little ones.  Older children will have a fun time decorating their own reindeer.

I plan on making these on felt instead of construction paper.  I also plan on turning mine into an ornament, and writing the date on the back.  I figured I could do my son's first 8 Christmases, and on his 8th Christmas we would have Santa's full reindeer team:)  There are a lot of other upgrades you could do:  You could make them on leather, make their collar out of leather, put Swarovski crystals or bells on the collar, add synthetic hair, make the antlers from sticks...I could go on forever.  

The best part of crafting, is putting your own twist on it.

Have a fun day crafting!!  Share your finished products on our Facebook page.  The most creative one will win a prize!!! (post them by  12/13 )


Sunday, November 6, 2011

Extra hour craft:)


I figured since we have an extra hour this weekend...why not do a craft??!!

Here is a cute Thanksgiving craft. I am going to do this every year, and add them to my book with the Halloween craft. Halloween craft

Here is the original site that the Mayflower craft appeared, with directions on how to do it:
Mayflower craft.

Friday, October 28, 2011

Trick or Treat:)


Aren't these so cute for trick or treaters??!!
I am not sure how parents would feel about open food in them (not sealed). If I was having a party I may put open items like cookies in them. For trick or treaters I think I would stick to candy in them.

Friday, October 21, 2011

Booo!!


I was searching for a fun Halloween project that I can do with a 7 month old. I found this great one on Pinterest. My favorite part of this project is that it becomes a keepsake. I think I will do this every year, and then have them bound into a book.

I have pinned a bunch of other fun Halloween projects on my Pinterest. Check it out!! http://pinterest.com/buckleyf/
Related Posts Plugin for WordPress, Blogger...
 
Design by Small Bird Studios | All Rights Reserved